【Kotlin】Viewを別のView上にアニメーションで移動する方法を調査する
今回は、Android のViewをObjectAnimatorを使って座標移動をする方法について調査します。
環境
今回のプロジェクトの環境です。Empty Activityでプロジェクトを作成しました。
Android Studio 2021.2.1
android {
    compileSdk 32

    defaultConfig {
        ... 省略
        minSdk 29
        targetSdk 32
    }
    ...
}
viewBinding を有効化する
viewBindingを有効にしておきます。
android {
    compileSdk 32

    defaultConfig {
        ... 省略
        minSdk 29
        targetSdk 32
    }
    ...
    buildFeatures {
        viewBinding = true
    }
}
MainActivityは以下のようにxmlファイルと紐づけておきます。
package com.example.translationanimation

import androidx.appcompat.app.AppCompatActivity
import android.os.Bundle
import com.example.translationanimation.databinding.ActivityMainBinding

class MainActivity : AppCompatActivity() {

    private lateinit var binding: ActivityMainBinding

    override fun onCreate(savedInstanceState: Bundle?) {
        super.onCreate(savedInstanceState)

        binding = ActivityMainBinding.inflate(layoutInflater)
        setContentView(binding.root)
    }
}
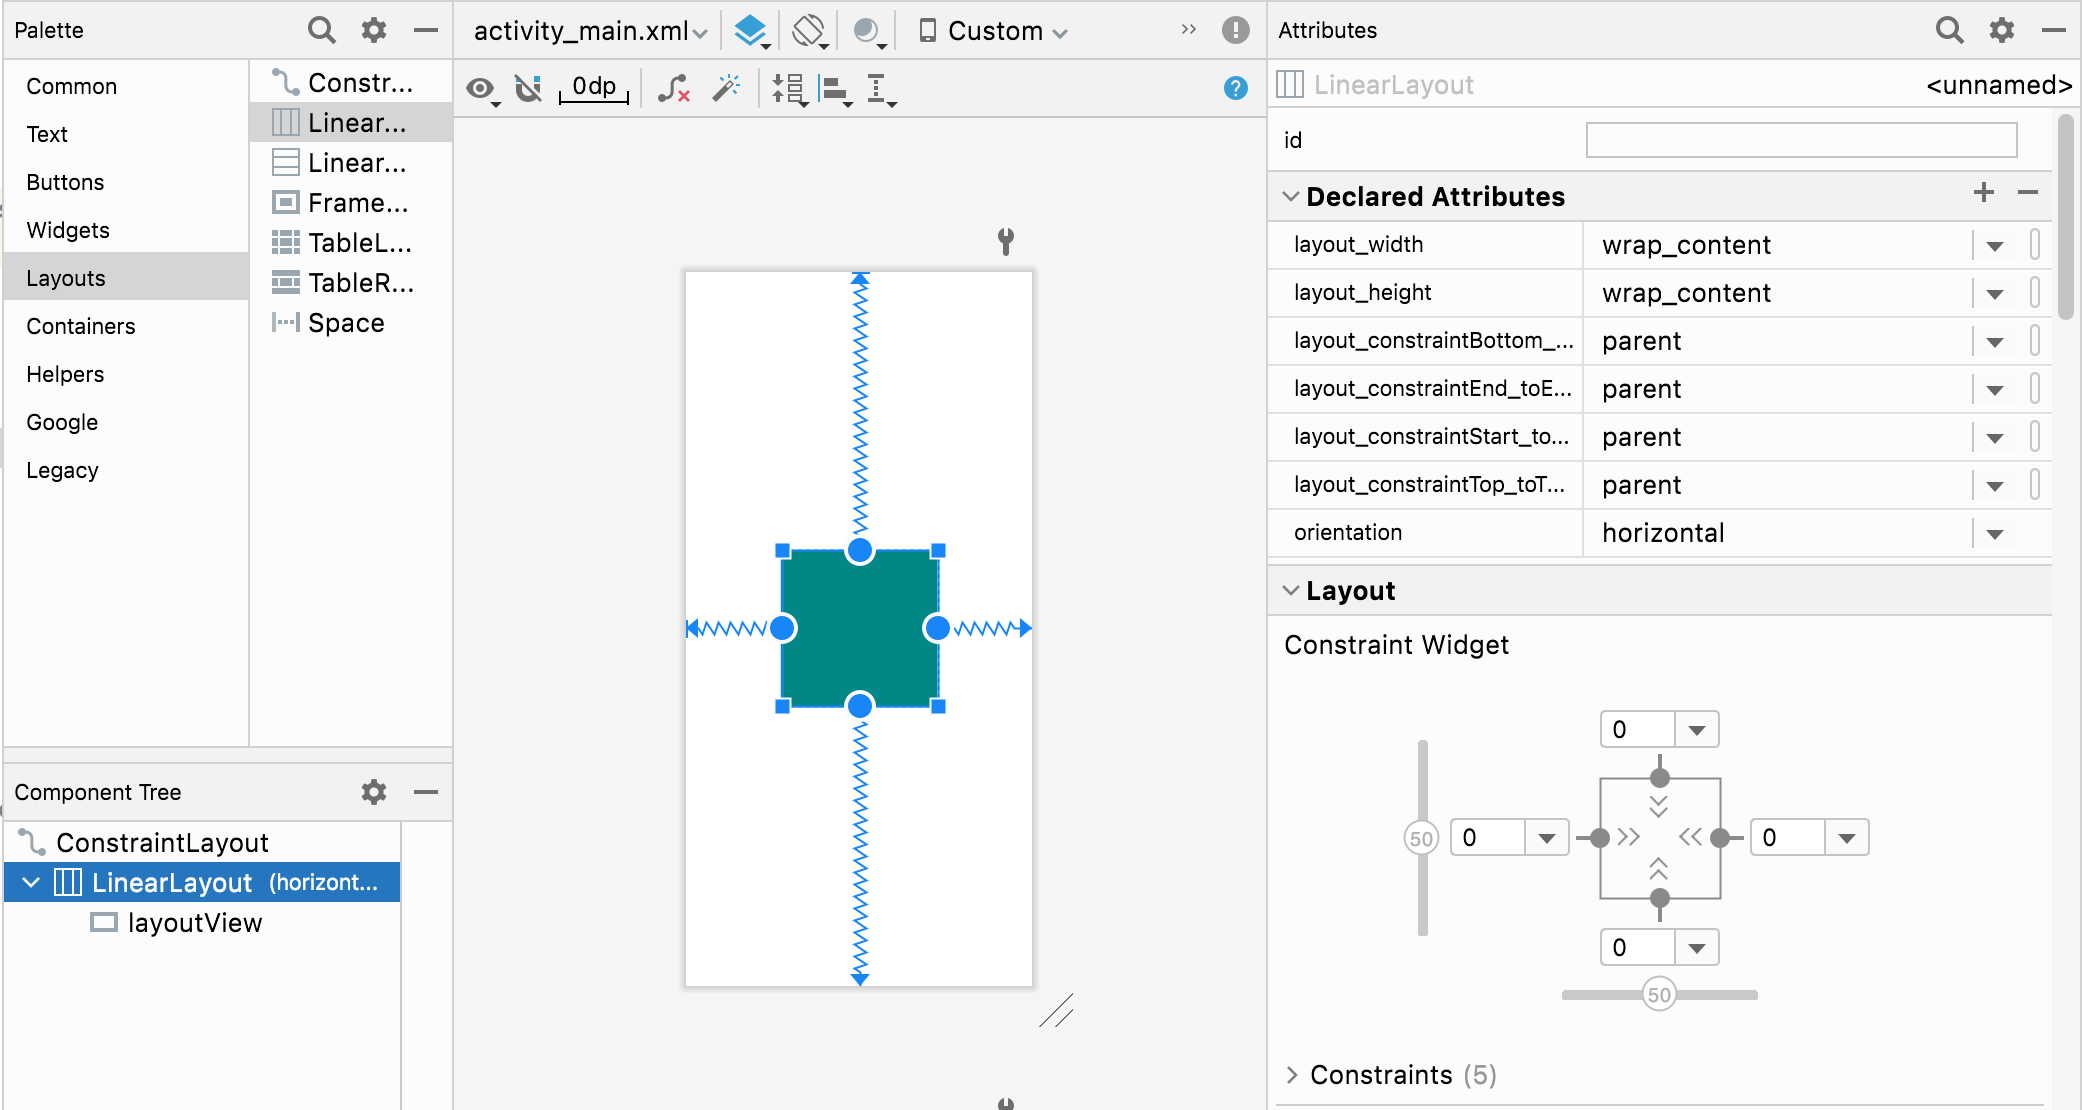
View を配置する
View の配置をコードで行っておきます。
package com.example.translationanimation

import androidx.appcompat.app.AppCompatActivity
import android.os.Bundle
import android.view.View
import android.widget.LinearLayout
import com.example.translationanimation.databinding.ActivityMainBinding

class MainActivity : AppCompatActivity() {

    private lateinit var binding: ActivityMainBinding

    override fun onCreate(savedInstanceState: Bundle?) {
        super.onCreate(savedInstanceState)

        binding = ActivityMainBinding.inflate(layoutInflater)
        setContentView(binding.root)

        // View の配置
        val view = View(this)
        val layoutParams = LinearLayout.LayoutParams(100, 100)
        view.layoutParams = layoutParams
        view.setBackgroundColor(getColor(R.color.teal_200))

        binding.root.addView(view)
    }
}
上記のように最低限のViewを配置して、実行します。
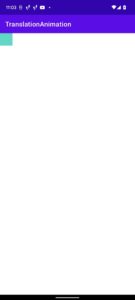
左上に配置された状態になりました。
基本の座標を調査する
まずは、基本の座標の調査をしていきます。
val view = View(this)
val layoutParams = LinearLayout.LayoutParams(100, 100)
view.layoutParams = layoutParams
// 初期位値を決める
view.x = 100f
view.y = 200f
view.setBackgroundColor(getColor(R.color.teal_200))

binding.root.addView(view)
これは、binding.rootを起点にして、以下のように座標を決定しています。
もうひとつ View を配置してみます。最初の View の半分のサイズで配置しました。
// 小さい View を追加
val secondView = View(this)
secondView.layoutParams = LinearLayout.LayoutParams(50, 50)

secondView.x = 100f
secondView.y = 200f
secondView.setBackgroundColor(getColor(R.color.purple_200))

binding.root.addView(secondView)
左上の座標が一致しているので、View のアンカーポイントが左上であることがわかります。
ObjectAnimator を使って View を移動してみる
次に ObjectAnimator を使って View を移動してみます。
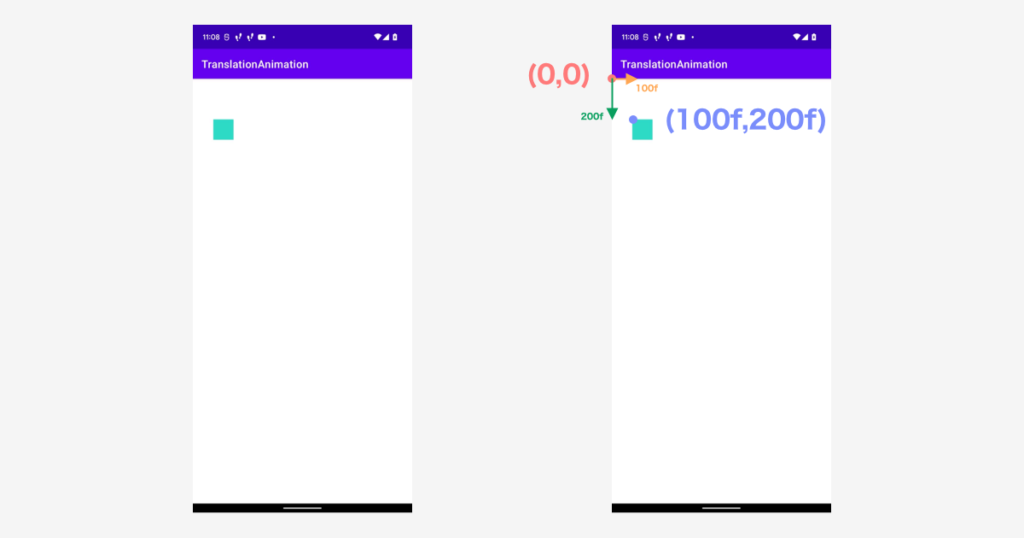
上記メモと同様に小さい View を用意してObjectAnimatorを使って、最初の View と重なるようにアニメーションを行います。
座標は (0f,0f) -> (100f, 200f)へ移動します。
// 小さい View を追加
val secondView = View(this)
secondView.layoutParams = LinearLayout.LayoutParams(50, 50)
secondView.setBackgroundColor(getColor(R.color.purple_200))

binding.root.addView(secondView)

// アニメーションをする
val translationX = PropertyValuesHolder.ofFloat(View.TRANSLATION_X, 100f)
val translationY = PropertyValuesHolder.ofFloat(View.TRANSLATION_Y, 200f)

val animation = ObjectAnimator.ofPropertyValuesHolder(secondView, translationX, translationY)
animation.duration = 5 * 1000 // 5秒
animation.start()
最初に配置したViewと重なるようにアニメーションが行われました。
これで View をアニメーションすることができたので、次のセクションでは、より細かいところの調査をしていきます。
各数値の単位について
まずは、各数値の単位について調査します。
LinearLayout.LayoutParams(100, 100)で、View の大きさを決めていますが、この100の単位を調査します。
この単位をdpと仮定して、layoutファイルより同様の値で配置します。
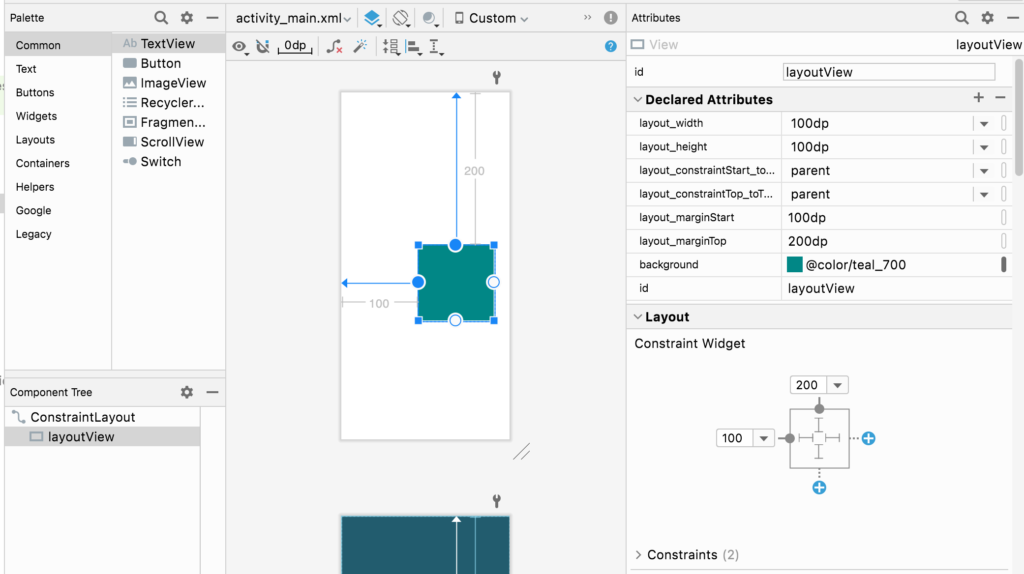
<?xml version="1.0" encoding="utf-8"?>
<androidx.constraintlayout.widget.ConstraintLayout
    xmlns:android="http://schemas.android.com/apk/res/android"
    xmlns:tools="http://schemas.android.com/tools"
    xmlns:app="http://schemas.android.com/apk/res-auto"
    android:layout_width="match_parent"
    android:layout_height="match_parent"
    tools:context=".MainActivity">

    <View
        android:id="@+id/layoutView"
        android:layout_width="100dp"
        android:layout_height="100dp"
        android:layout_marginStart="100dp"
        android:layout_marginTop="200dp"
        android:background="@color/teal_700"
        app:layout_constraintStart_toStartOf="parent"
        app:layout_constraintTop_toTopOf="parent" />
</androidx.constraintlayout.widget.ConstraintLayout>
実行結果は以下のようになりました。
これより、コード上で指定している値はdpではないことがわかります。
Layour Paramsのドキュメントを見ると、コードで指定しているのは px であることがわかります。
Int: the width, either WRAP_CONTENT, FILL_PARENT (replaced by MATCH_PARENT in API Level 8), or a fixed size in pixels
Int: the height, either WRAP_CONTENT, FILL_PARENT (replaced by MATCH_PARENT in API Level 8), or a fixed size in pixels
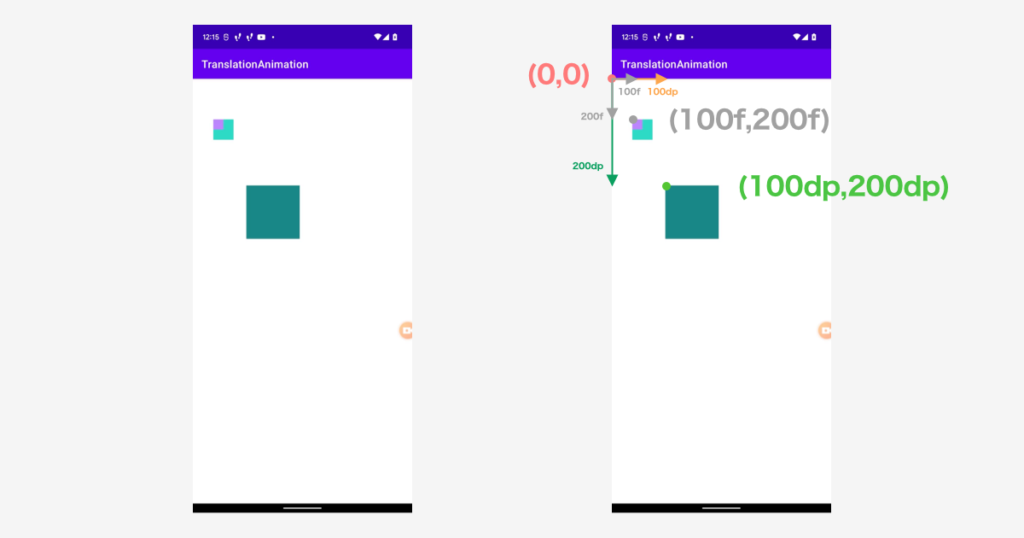
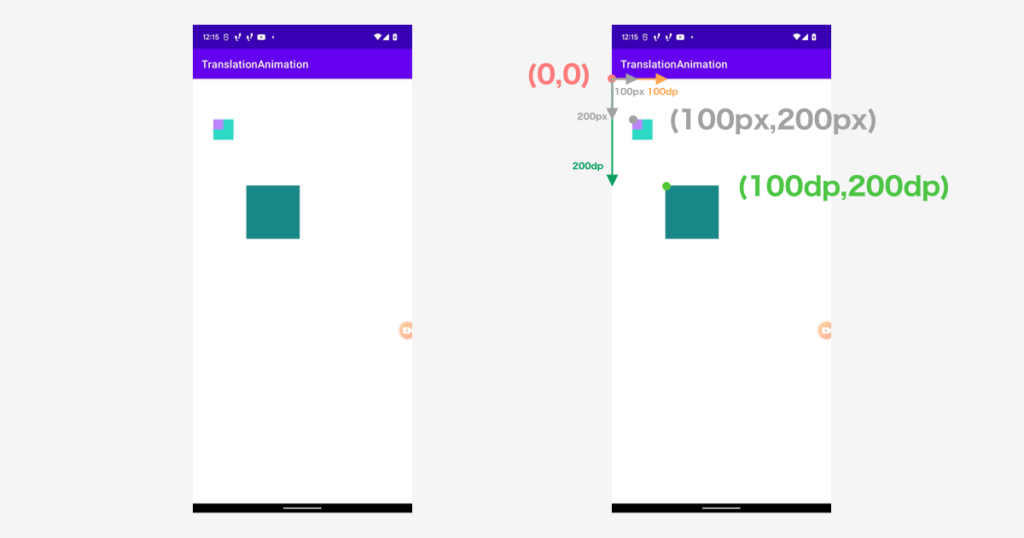
同様にview.x = 100f; view.y = 200fを指定している値も px となります。
View のドキュメントより、pixel であると明記されています。
The geometry of a view is that of a rectangle. A view has a location, expressed as a pair of left and top coordinates, and two dimensions, expressed as a width and a height. The unit for location and dimensions is the pixel.
つまり、現在このような座標になっていることがわかります。
dpとpxを相互変換する
最初にコードで用意した View を、レイアウト上で配置した View と同じ場所に配置しようと思った場合、px と dp の変換を行う必要があります。
【Kotlin】px ↔ dpの変換方法を参考にし、以下のようにエクステンションを用意しました。
fun Int.dp(context: Context) : Float {
    // 例: 100dp は 何px かを返す
    val metrics = context.getResources().getDisplayMetrics()
    return this * metrics.density
}
この extension を使って以下のように書き換えてみました。
val view = View(this)
val layoutParams = LinearLayout.LayoutParams(
    100.dp(this).toInt(),
    100.dp(this).toInt()
)
view.layoutParams = layoutParams

view.x = 100.dp(this)
view.y = 200.dp(this)
view.setBackgroundColor(getColor(R.color.teal_200))

binding.root.addView(view)
extension の書き方は非常に悩みますが、100dp のサイズと位置だよということを直観的にわかるような形にしてみました。(逆にややこしいかもしれないけど。。。)
以下のコードで、レイアウトで配置した View と重なることを確認します。
val view = View(this)
val layoutParams = LinearLayout.LayoutParams(
    100.dp(this).toInt(),
    100.dp(this).toInt()
)
view.layoutParams = layoutParams
view.setBackgroundColor(getColor(R.color.teal_200))
binding.root.addView(view)

// アニメーションをする
val translationX = PropertyValuesHolder.ofFloat(View.TRANSLATION_X, 100.dp(this))
val translationY = PropertyValuesHolder.ofFloat(View.TRANSLATION_Y, 200.dp(this))

val animation = ObjectAnimator.ofPropertyValuesHolder(view, translationX, translationY)
animation.duration = 5 * 1000 // 5秒
animation.start()
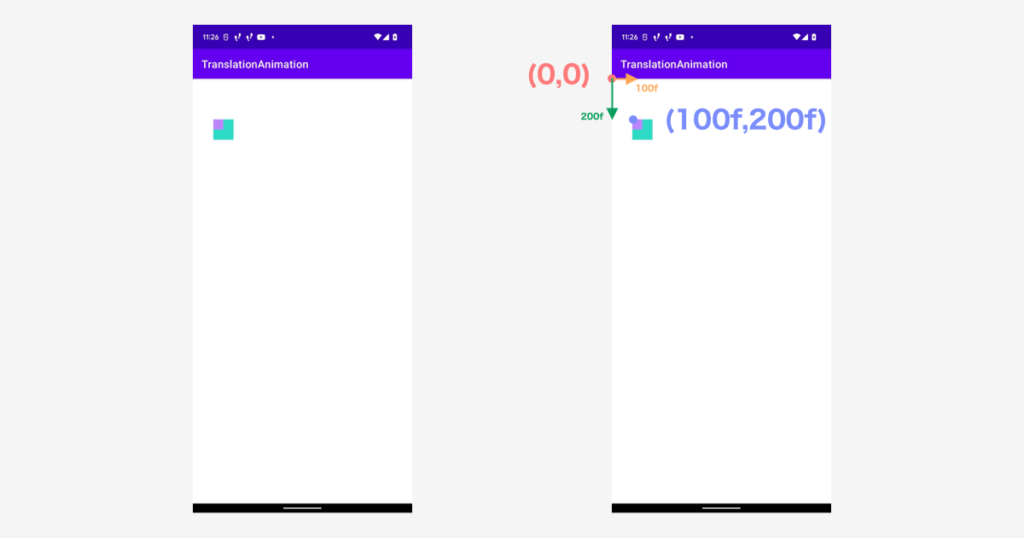
以下のように、レイアウトで配置した View と重なるので px -> dp への変換ができていることがわかります。
![]()
任意の場所に配置されたViewまで移動する
これまではxmlファイルで(100dp, 200dp)と指定していたので重ねることができました。
次に、xmlファイル上で適当に配置された View に重なるようにアニメーションをしたいと思います。
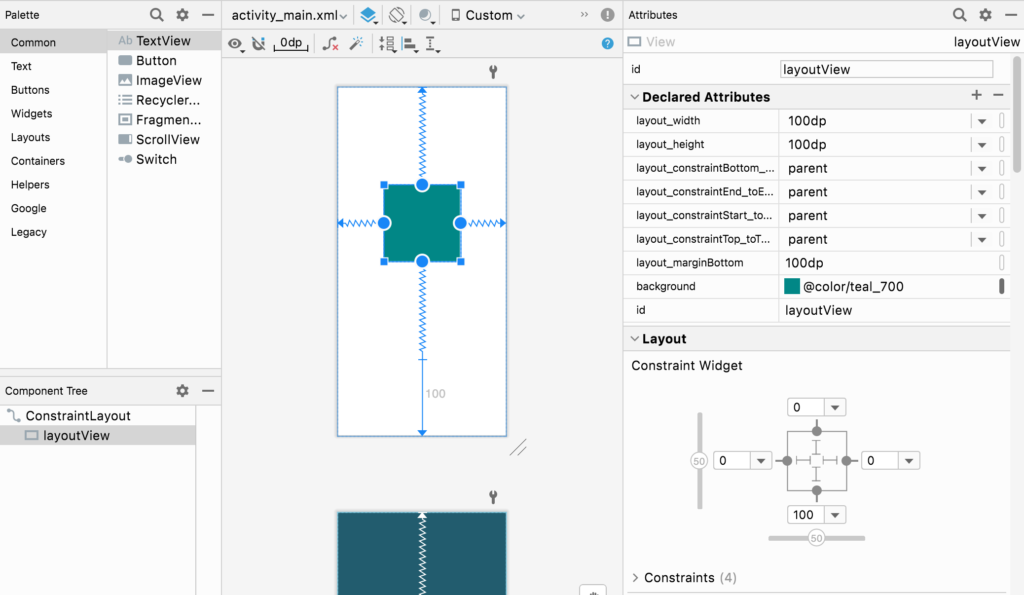
以下のように View を配置しました。
<?xml version="1.0" encoding="utf-8"?>
<androidx.constraintlayout.widget.ConstraintLayout
    xmlns:android="http://schemas.android.com/apk/res/android"
    xmlns:tools="http://schemas.android.com/tools"
    xmlns:app="http://schemas.android.com/apk/res-auto"
    android:layout_width="match_parent"
    android:layout_height="match_parent"
    tools:context=".MainActivity">

    <View
        android:id="@+id/layoutView"
        android:layout_width="100dp"
        android:layout_height="100dp"
        android:layout_marginBottom="100dp"
        android:background="@color/teal_700"
        app:layout_constraintBottom_toBottomOf="parent"
        app:layout_constraintEnd_toEndOf="parent"
        app:layout_constraintStart_toStartOf="parent"
        app:layout_constraintTop_toTopOf="parent" />
</androidx.constraintlayout.widget.ConstraintLayout>
この View の位置は左上から何dpかの指定がされていません。このような場合について考えていきます。
コードから座標を取得してみます。(layoutViewというidをつけました)
val targetX = binding.layoutView.x
val targetY = binding.layoutView.y

println(">> layoutView $targetX $targetY")
出力結果は >> layoutView 0.0 0.0となりました。
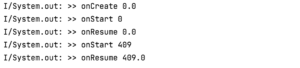
各ライフサイクルで座標の取得を行ってみました。
override fun onCreate(savedInstanceState: Bundle?) {
    super.onCreate(savedInstanceState)
    println(">> onCreate ${binding.layoutView.x}")
}

override fun onStart() {
    super.onStart()

    println(">> onStart ${binding.layoutView.left}")
}

override fun onResume() {
    super.onResume()

    println(">> onResume ${binding.layoutView.x}")
}
結果はどれも 0 を返し、その後バックグラウンドから戻った場合に値が入っていることに気づきました。
View のレイアウトの決定は、onResumeでもされていません。
View.getX and getY returns zero – Stack overflowより、以下のようにレイアウトが決定した後に座標の取得をします。
binding.layoutView.post {
    println(">> post ${binding.layoutView.x}")
}
post内で正しい値を取得することができます。
上記メモより、post内で正しい座標を取得した後、アニメーションしてみます。
val view = View(this)
val layoutParams = LinearLayout.LayoutParams(
    100.dp(this).toInt(),
    100.dp(this).toInt()
)
view.layoutParams = layoutParams
view.setBackgroundColor(getColor(R.color.teal_200))

binding.root.addView(view)

binding.layoutView.post {
    val targetX = binding.layoutView.x
    val targetY = binding.layoutView.y

    // アニメーションをする
    val translationX = PropertyValuesHolder.ofFloat(View.TRANSLATION_X, targetX)
    val translationY = PropertyValuesHolder.ofFloat(View.TRANSLATION_Y, targetY)

    val animation = ObjectAnimator.ofPropertyValuesHolder(view, translationX, translationY)
    animation.duration = 5 * 1000 // 5秒
    animation.start()
}
これを実行すると、以下のように正しく重なります。
![]()
またこの結果により、binding.layoutView.xとbinding.layoutView.yで取得した値は、pixelでの値であることがわかります。
入れ子になったViewの座標
これまではルートのViewに直接配置していたので、ルートからの座標であることがわかっていました。
入れ子になった View はどのような結果になるのか調査します。
先ほどのlayoutViewを、新しく配置した LinearLayout の中に置きました。
<?xml version="1.0" encoding="utf-8"?>
<androidx.constraintlayout.widget.ConstraintLayout
xmlns:android="http://schemas.android.com/apk/res/android"
xmlns:tools="http://schemas.android.com/tools"
xmlns:app="http://schemas.android.com/apk/res-auto"
android:layout_width="match_parent"
android:layout_height="match_parent"
tools:context=".MainActivity">
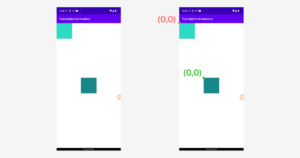
<LinearLayout
android:id="@+id/linearLayout"
android:layout_width="wrap_content"
android:layout_height="wrap_content"
android:orientation="horizontal"
app:layout_constraintBottom_toBottomOf="parent"
app:layout_constraintEnd_toEndOf="parent"
app:layout_constraintStart_toStartOf="parent"
app:layout_constraintTop_toTopOf="parent">
<View
android:id="@+id/layoutView"
android:layout_width="100dp"
android:layout_height="100dp"
android:background="@color/teal_700" />
</LinearLayout>
</androidx.constraintlayout.widget.ConstraintLayout>
先ほどと同様にlayoutViewの座標を取得します。
binding.layoutView.post {
    println(">> linearLayout ${binding.linearLayout.x}")
    println(">> layoutView ${binding.layoutView.x}")
}
![]()
上記のようにlayoutViewの x座標は0になりました。
これにより、取得できる座標は親 View から何pxかであることがわかりました。
座標系を揃える
上記のように入れ子になった View では取得した座標が親からの位置となります。
先ほどのようにコードでルート View 上に配置した View を、入れ子された View まで移動させるには難しくなります。
これまでのように原点(0,0)の位置が同じではなくなります。
これを解消するために、View.getLocationInWindowまたはView.getLocationOnScreenを利用します。
[Android]View の位置を取得する関数たち – Qiitaの記事を参考に、以下の extension を用意しました。
// ウィンドウ上での座標
fun View.getLocationPointInWindow(): Point {
    val array = IntArray(2)
    this.getLocationInWindow(array)
    return Point(array[0], array[1])
}

// スクリーン上での座標
fun View.getLocationPointOnScreen(): Point {
    val array = IntArray(2)
    this.getLocationOnScreen(array)
    return Point(array[0], array[1])
}
View.getLocationInWindowまたはView.getLocationOnScreenを使うことにより、入れ子になった View でも同じ原点から計算することができます。
ウィンドウからの位置を用いて以下のようにlayoutViewの位置を取得してアニメーションしてみましょう。
binding.layoutView.post {
    val layoutViewPoint = binding.layoutView.getLocationPointInWindow()
    val targetX = layoutViewPoint.x.toFloat()
    val targetY = layoutViewPoint.y.toFloat()

    // アニメーションをする
    val translationX = PropertyValuesHolder.ofFloat(View.TRANSLATION_X, targetX)
    val translationY = PropertyValuesHolder.ofFloat(View.TRANSLATION_Y, targetY)

    val animation = ObjectAnimator.ofPropertyValuesHolder(view, translationX, translationY)
    animation.duration = 5 * 1000 // 5秒
    animation.start()
}
結果は以下のようにずれてしまいました。
上記のGIFで起こった現象を図にしてみました。

layoutViewの位置は(409px, 1180px)で、今回行ったアニメーションは(windowでのx座標(0px) + 409px, window でのy座標(265px) + 1180px)となります。
動かすViewの window 上での座標を引いてやることで正しい位置にアニメーションを行うことができます。
binding.layoutView.post {
    view.post {
        val layoutViewPointInWindow = binding.layoutView.getLocationPointInWindow()
        val viewPointInWindow = view.getLocationPointInWindow()
        val targetX = layoutViewPointInWindow.x.toFloat() - viewPointInWindow.x.toFloat()
        val targetY = layoutViewPointInWindow.y.toFloat() - viewPointInWindow.y.toFloat()

        // アニメーションをする
        val translationX = PropertyValuesHolder.ofFloat(View.TRANSLATION_X, targetX)
        val translationY = PropertyValuesHolder.ofFloat(View.TRANSLATION_Y, targetY)

        val animation = ObjectAnimator.ofPropertyValuesHolder(view, translationX, translationY)
        animation.duration = 5 * 1000 // 5秒
        animation.start()
    }
}
初期位置が設定されている場合
次のように初期位置を20dpずつずらしたViewを移動させた場合、最終的な位置もずれてしまいます。
val view = View(this)
val layoutParams = LinearLayout.LayoutParams(
    100.dp(this).toInt(),
    100.dp(this).toInt()
)
view.layoutParams = layoutParams
// 初期位置をずらす
view.x = 20.dp(this)
view.y = 20.dp(this)

view.setBackgroundColor(getColor(R.color.teal_200))

binding.root.addView(view)

binding.layoutView.post {
    view.post {
        val layoutViewPointInWindow = binding.layoutView.getLocationPointInWindow()
        val viewPointInWindow = view.getLocationPointInWindow()
        val targetX = layoutViewPointInWindow.x.toFloat() - viewPointInWindow.x.toFloat()
        val targetY = layoutViewPointInWindow.y.toFloat() - viewPointInWindow.y.toFloat()

        // アニメーションをする
        val translationX = PropertyValuesHolder.ofFloat(View.TRANSLATION_X, targetX)
        val translationY = PropertyValuesHolder.ofFloat(View.TRANSLATION_Y, targetY)

        val animation = ObjectAnimator.ofPropertyValuesHolder(view, translationX, translationY)
        animation.duration = 5 * 1000 // 5秒
        animation.start()
    }
}
これは以下の図のような状態になっています。
![]()
かなりややこしいです。
移動後のWindow上での座標 - 移動させたいViewのWindow上での座標で求めると、上記のようにずれて意しまいます。
これは、アニメーションの原点(どの位置からアニメーションを開始するか)が、この View の親 Viewの位置(図のオレンジの点の位置)だから起きているようです。
つまり、移動後のWindow上での座標 - 移動させたいViewの親ViewのWindow上での座標を指定することで、無事に正しい座標を出すことができます。
val view = View(this)
val layoutParams = LinearLayout.LayoutParams(
    100.dp(this).toInt(),
    100.dp(this).toInt()
)
view.layoutParams = layoutParams
view.x = 100.dp(this)
view.y = 200.dp(this)

view.setBackgroundColor(getColor(R.color.teal_200))

binding.moveLinearLayout.addView(view)

binding.layoutView.post {
    view.post {
        val layoutViewPointInWindow = binding.layoutView.getLocationPointInWindow()
        val viewPointInWindow = (view.parent as? View)?.getLocationPointInWindow() ?: return@post

        println(">> ${viewPointInWindow}")
        val targetX = layoutViewPointInWindow.x.toFloat() - viewPointInWindow.x.toFloat()
        val targetY = layoutViewPointInWindow.y.toFloat() - viewPointInWindow.y.toFloat()

        println(">> $targetX, $targetY")

        // アニメーションをする
        val translationX = PropertyValuesHolder.ofFloat("translationX", targetX)
        val translationY = PropertyValuesHolder.ofFloat("translationY", targetY)

        val animation = ObjectAnimator.ofPropertyValuesHolder(view, translationX, translationY)
        animation.duration = 5 * 1000 // 5秒
        animation.start()
    }
}
上記を実行するとピッタリと重なることが確認できます。
おわりに
今回の記事のまとめとして、以下の extension を作ってみました。
fun View.moveAnimation(toView: View, duration: Long) : ObjectAnimator? {
    val parentViewPoint = (this.parent as? View)?.getLocationPointInWindow() ?: return null
    val toViewPoint = toView.getLocationPointInWindow()
    val targetX: Float = toViewPoint.x.toFloat() - parentViewPoint.x.toFloat()
    val targetY: Float = toViewPoint.y.toFloat() - parentViewPoint.y.toFloat()

    val tranlationX = PropertyValuesHolder.ofFloat(View.TRANSLATION_X, targetX)
    val tranlationY = PropertyValuesHolder.ofFloat(View.TRANSLATION_Y, targetY)

    val animation = ObjectAnimator.ofPropertyValuesHolder(this, tranlationX, tranlationY)
    animation.duration = duration

    return animation
}
各Viewの座標が決定されてから実行することで、目標のViewまで移動アニメーションを行うことができます。
binding.layoutView.post {
    view.post {
        val moveAnimation = view.moveAnimation(binding.layoutView, 2 * 1000)
        moveAnimation?.start()
    }
}
かなり難しくてうまくまとめられていませんが、以上にします。ヘトヘトです。