Next.js のプロジェクトを作成して開発環境の Docker で動くようにする【その1】
Next.js で作った自作サイトをVPSで公開する方法について考えてみたの続きです。
今回は、前回考えたタスクを踏まえて、まずは Next.js のプロジェクトを作成して、ローカルの Docker 環境で動くようにします。
Next.jsプロジェクトを開発環境と本番環境のDockerで動かしてみたい【その1】 では、サンプルのプロジェクトを動かしましたが、今回はサンプルではなく自作のプロジェクトをローカルの Docker 上で動かすことを目標とします。
Next.js プロジェクトを作成する
まずは Next.js プロジェクトの作成を行います。
公式ドキュメントを参考に、npx create-next-appコマンドを使ってプロジェクトの作成を行います。
プロジェクト内で TypeScript を利用したいのでオプションに --typescriptを付与します。
プロジェクト名は donuts-site にしました🍩
# 作業用ディレクトリに移動
$ cd ~/NextProjects
# プロジェクトの作成
$ npx create-next-app --typescript
実行結果
Need to install the following packages:
create-next-app
Ok to proceed? (y) y
✔ What is your project named? … donuts-site
Creating a new Next.js app in /Users/username/NextProjects/donuts-site.

Using yarn.

Installing dependencies:
- react
- react-dom
- next

yarn add v1.22.18
info No lockfile found.
[1/4] 🔍 Resolving packages...
[2/4] 🚚 Fetching packages...
[3/4] 🔗 Linking dependencies...
[4/4] 🔨 Building fresh packages...
success Saved lockfile.
warning Your current version of Yarn is out of date. The latest version is "1.22.19", while you're on "1.22.18".
info To upgrade, run the following command:
$ brew upgrade yarn
success Saved 16 new dependencies.
info Direct dependencies
├─ next@12.2.5
├─ react-dom@18.2.0
└─ react@18.2.0
info All dependencies
├─ @next/env@12.2.5
├─ @next/swc-darwin-x64@12.2.5
├─ @swc/helpers@0.4.3
├─ caniuse-lite@1.0.30001375
├─ js-tokens@4.0.0
├─ nanoid@3.3.4
├─ next@12.2.5
├─ picocolors@1.0.0
├─ postcss@8.4.14
├─ react-dom@18.2.0
├─ react@18.2.0
├─ scheduler@0.23.0
├─ source-map-js@1.0.2
├─ styled-jsx@5.0.4
├─ tslib@2.4.0
└─ use-sync-external-store@1.2.0
✨ Done in 27.67s.

Installing devDependencies:
- eslint
- eslint-config-next
- typescript
- @types/react
- @types/node
- @types/react-dom

yarn add v1.22.18
[1/4] 🔍 Resolving packages...
[2/4] 🚚 Fetching packages...
error @eslint/eslintrc@1.3.0: The engine "node" is incompatible with this module. Expected version "^12.22.0 || ^14.17.0 || >=16.0.0". Got "14.16.0"
error Found incompatible module.
info Visit https://yarnpkg.com/en/docs/cli/add for documentation about this command.

Aborting installation.
yarn add --exact --cwd /Users/username/NextProjects/donuts-site --dev eslint eslint-config-next typescript @types/react @types/node @types/react-dom has failed.
エラーが出てしまいました。ディレクトリはできていますが、中身が足りていないのでやり直しが必要です😢
発生したエラーの解消
まずは warning の解消をします。warning は以下の内容です。
warning Your current version of Yarn is out of date. The latest version is "1.22.19", while you're on "1.22.18".
info To upgrade, run the following command:
$ brew upgrade yarn
yarn のバージョンが古いので最新バージョンにしてねということで、アップデートをします。
yarn を何経由で入れたのか覚えていませんが、brew コマンドを提示されているので、そのまま打ってみます。
$ yarn -v
1.22.18

$ brew upgrade yarn

$ yarn -v
1.22.19
brew 経由だったようなので無事アップグレードができました。
次に、error の解消をします。エラーは以下の内容です。
ESLint が nodeのバージョンの問題により入らなかったようです。
[1/4] 🔍 Resolving packages...
[2/4] 🚚 Fetching packages...
error @eslint/eslintrc@1.3.0: The engine "node" is incompatible with this module. Expected version "^12.22.0 || ^14.17.0 || >=16.0.0". Got "14.16.0"
error Found incompatible module.
info Visit https://yarnpkg.com/en/docs/cli/add for documentation about this command.
ESLint(https://eslint.org/)は、JavaScript コードの問題を発見し修正することを支援する静的解析ツールです。構文エラー等を見つけて指摘をしてくれます。
Next.js プロジェクトを作成する際には標準で利用するようになっています。
文字通り nodeのバージョンの互換性がないとのことなので Node.js のアップデートをしてみます。
こちらも何経由で導入しているのかを覚えていないのでそちらの調査をしてみます。
$ node -v
v14.16.0

# Homebrew 経由? -> ちがった
$ nodebrew -v
zsh: command not found: nodebrew

# nodenv 使ってる?
$ nodenv -v
nodenv 1.4.0+3.631d0b6

# nodenv から node のバージョンをアップデートを試みる
$ nodenv install 16.16.0
node-build: definition not found: 16.16.0

See all available versions with `nodenv install --list'.

If the version you need is missing, try upgrading node-build:

git -C /Users/usename/.anyenv/envs/nodenv/plugins/node-build pull

# nodenv でインストールできる Node.js のバージョンを確認
$ nodenv install --list

# 古いバージョンしかないので nodenv のアップデートが必要
# Homebrew 経由? -> ちがった
$ brew upgrade nodenv
Error: nodenv not installed

# node の情報教えて...
$ which node
/Users/username/.anyenv/envs/nodenv/shims/node

# anyenv でアップデートをする
$ anyenv update

anyenv: no such command `update'

# anyenv のアップデートプラグインを入れる...
$ mkdir -p $(anyenv root)/plugins
$ git clone https://github.com/znz/anyenv-update.git $(anyenv root)/plugins/anyenv-update

# anyenv でアップデートをする
$ anyenv update

# nodenv で改めてインストールできる Node.js のリストを見る
$ nodenv install --list

# nodenv から node のバージョンをアップデートをする
$ nodenv install 16.16.0
Downloading node-v16.16.0-darwin-x64.tar.gz...
-> https://nodejs.org/dist/v16.16.0/node-v16.16.0-darwin-x64.tar.gz
Installing node-v16.16.0-darwin-x64...
Installed node-v16.16.0-darwin-x64 to /Users/uruly/.anyenv/envs/nodenv/versions/16.16.0

# nodenv でバージョンを確認する
$ nodenv versions
system
* 14.16.0 (set by /Users/username/.anyenv/envs/nodenv/version)
16.16.0

# バージョンを切り替える
$ nodenv global 16.16.0

# バージョンを確認
$ node -v
v16.16.0
anyenv のアップデートプラグインについては nodenvをupdateして新しいバージョンのNode.jsをインストールするを参照させていただきました。
沼ってしまいましたが、無事に Node.js のアップデートができたのでもう一度実行していきます。
沼部分を全て書いているので余計なコマンドをたくさん書いているので参考にはならないかもしれませんが😢 みんなこんな感じだよね…?😢
# 作業用ディレクトリに移動
$ cd ~/NextProjects
# 先ほどのゴミがあったら削除しておく
$ rm -rf donuts-site
# プロジェクトの作成
$ npx create-next-app --typescript

~~
Initialized a git repository.

Success! Created donuts-site at /Users/username/NextProjects/donuts-site
ようやくプロジェクトを作成することができました。
donuts-site
  ├── README.md
  ├── next-env.d.ts
  ├── next.config.js
  ├── node_modules
  ├── package.json
  ├── pages
  ├── public
  ├── styles
  ├── tsconfig.json
  └── yarn.lock
Docker なしで動かしてみる
まずは Docker なしでそのまま起動してみます。
$ cd ~/NextProjects/donuts-site

# 起動する
$ npm run dev

> donuts-site@0.1.0 dev
> next dev

ready - started server on 0.0.0.0:3000, url: http://localhost:3000
info - SWC minify release candidate enabled. https://nextjs.link/swcmin
event - compiled client and server successfully in 1891 ms (178 modules)
wait - compiling...
event - compiled client and server successfully in 65 ms (178 modules)
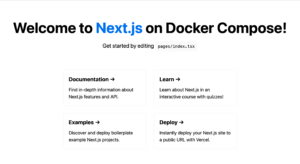
http://localhost:3000 にアクセスして以下の画面が表示されることを確認したら、 control+cで止めておきます。
npm run devコマンドは、package.json ファイルで指定されているdevを実行しています。
{
  "scripts": {
    "dev": "next dev",
    "build": "next build",
    "start": "next start",
    "lint": "next lint"
  }
}
next devについては公式ドキュメントを参照してください。
npm run devの代わりにnpx next devとして直接実行することもできます。
これはポート番号を変えて実行したい場合などに利用することができます。
# これは実行できない
$ npm run dev -p 4000

# ポート番号を変更して実行する
$ npx next dev -p 4000
おわりに
ドキュメント上では1つのコマンドで簡単にできるように見えることも、実際にやってみるとうまくいかない箇所が多いですね。
Node.js は anyenv 経由なのに yarn が Homebrew 経由で導入していることに若干の違和感があり、環境がぐちゃぐちゃ説が浮上しています。もしそうであっても見逃していただけると助かります🙏
長くなってしまったので Docker 上で起動するのは次回頑張ります。
つづく 🐈⬛