Mac 買い替え後に行った環境構築や移行したサービス等のメモ【随時更新】
新しい Mac を購入したので、環境構築や古い Mac から移行させたものについてメモしていきます。
実際に作業を行いながら、随時更新をしていきます。できるだけ細かい作業もメモします。
ブラウザのインストール
Firefox 民なので Firefox をインストール。
公式サイトよりダウンロード。
システム設定 > デスクトップとDock > デフォルトのWebブラウザ > Firefox に変更
Firefoxを開き、メニューバーより ツール > ログイン を選択
ログイン後 端末の同期を行う。
右のメニューアイコンよりブックマーク > ブックマークツールバーを表示
移行完了👌
Xcode のダウンロード
次のターミナルの設定時にgitを用いるので、先にXcodeをいれておきます。
Developer なので https://developer.apple.com/download/allから入手。
Xcode14.3.1 と Command Line Tools for Xcode 14.3.1 をダウンロード。
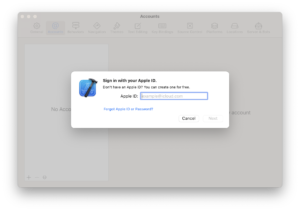
Xcode を起動して、サインインしておきます。
ターミナルの設定
まずは Finder > アプリケーション > ユーティリティ > ターミナル をDockに追加。
作業中は不可視ファイルが見えないと不便なので、command + shift + .で不可視ファイルが見えるようにする。
プロファイルの移行
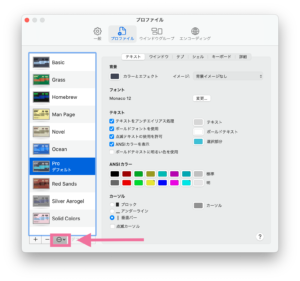
古いMacでターミナルを開き、メニューバーより設定を開く。
プロファイルタブを開き、移行したいプロファイルを書き出す。
Profile.terminalをAirdropでわたし、新しいMacでダブルクリックして開く。「開発元が未確認のため開けません。」が出た場合は、右クリックで開く。
設定が反映されたターミナルが起動する。
新しいMacでターミナルを開き、メニューバーより設定を開く。
プロファイルタブを開き、先ほど適応したプロファイルを選択し、デフォルトボタンを押してデフォルトに設定する。
preztoのインストール
preztoを使ってさらにテーマを変更。
preztoを GitHub よりダウンロード。
$ git clone --recursive https://github.com/sorin-ionescu/prezto.git "${ZDOTDIR:-$HOME}/.zprezto"

$ setopt EXTENDED_GLOB
for rcfile in "${ZDOTDIR:-$HOME}"/.zprezto/runcoms/^README.md(.N); do
  ln -s "$rcfile" "${ZDOTDIR:-$HOME}/.${rcfile:t}"
done
古いMacの以下のファイルの中身をコピーして新しいMacの同じファイルに貼り付ける。
– .zpreztorc
– .zprofile
– .zshrc
ターミナルの設定 DONE ✅
Git の設定
ユーザ設定を行っていきます。
古いMacの.gitconfigファイルの中身をコピーして貼り付けします。
新しいMacにはまだファイルがないので作成して貼り付けします。
$ vi .gitconfig
GitHubのSSH接続
GitHubのドキュメントを参考に、新しい SSH キーを生成して ssh-agent に追加します。
ターミナルにて
$ cd ~/.ssh

$ ssh-keygen -t ed25519 -C "your_email@example.com"
> github_id_ed25519
> キーフレーズの入力

# ssh-agentを開始
$ eval "$(ssh-agent -s)"
Agent pid 5959

# config ファイルの作成
$ touch ~/.ssh/config

# 編集する
$ code ~/.ssh/config
# GitHub
Host github.com
  AddKeysToAgent yes
  UseKeychain yes
  IdentityFile ~/.ssh/github_id_ed25519
ターミナルに戻り、SSH 秘密鍵を ssh-agent に追加します。
# キーフレーズを毎回入力せずに接続したい場合(キーチェーンに保存される)
$ ssh-add --apple-use-keychain ~/.ssh/github_id_ed25519
GitHubを開き、GitHub アカウントへの新しい SSH キーの追加を参考にSSH 公開鍵を設定します。
https://github.com/settings/ssh/newに、github_id_ed15519.pubの中身をコピーして貼り付けます。Key typeはAuthentication Keyを指定します。
ターミナルに戻り、SSH接続できるか確認します。
$ ssh -T git@github.com

This key is not known by any other names
Are you sure you want to continue connecting (yes/no/[fingerprint])? yes
コミットテンプレートの追加
古いMacから.commit_tempをコピーして、新しいMacに貼り付けます。
$ touch ~/.commit_temp
こんな感じのテンプレートをおいています。
# ==== Emojis ====
# 🐛  :bug: バグ修正
# 以下略
グローバルな.gitignore
.gitignoreで.DS_Storeを削除しようを参考に、globalな .gitignore ファイルを作成します。
# フォルダの作成と移動
$ mkdir ~/.config/git && cd ~/.config/git

# ignore ファイルを作成
$ touch ignore
.DS_Store
Alfred の導入
Alfredをインストール。
起動してセットアップをする。画面の手順に従ってセットアップ完了。
Alfredを起動し、Appearance を変更。Options よりさらにスタイルを変更。
Homebrew の導入
Homebrewよりコマンドをコピーします。
ターミナルを開き
$ /bin/bash -c "$(curl -fsSL https://raw.githubusercontent.com/Homebrew/install/HEAD/install.sh)"
/opt/homebrew/の中に実態があるんですね。
パスを通します。 先ほどの最後の部分に==> Next steps:が書かれているので、そこに書かれている2つのコマンドを叩きます。
$ (echo; echo 'eval "$(/opt/homebrew/bin/brew shellenv)"') >> /Users/ユーザ名/.zprofile

$ eval "$(/opt/homebrew/bin/brew shellenv)"

# 正しくインストールできたか確認する
$ brew -v
Homebrew 4.1.1
Mintの導入
Swift 製のパッケージマネージャである yonaskolb/Mintを導入します。
ターミナルを開き、brew を使ってインストールします。
$ brew install mint

# brew で mint が管理されていることを確認
$ brew list mint
==> Formulae
mint

# mint コマンドが使えることを確認
$ mint version
Version: 0.17.5
エラーの解消
mint bootstrapを実行すると以下のようにエラーが起きました。
🌱 Cloning SwiftLint 0.52.4
🌱 Resolving package
error: terminated(1): /usr/bin/xcrun –sdk macosx –show-sdk-platform-path output:
xcrun: error: unable to lookup item ‘PlatformPath’ from command line tools installation
xcrun: error: unable to lookup item ‘PlatformPath’ in SDK ‘/Library/Developer/CommandLineTools/SDKs/MacOSX.sdk’
🌱 Encountered error during “swift package resolve”. Use –verbose to see full output
🌱 Failed to resolve SwiftLint 0.52.4 with SPM
Running Swift build in Terminal leading to “Platform Path” errorsを参考に利用するコマンドラインツールを変更します。
# 現在のパスを確認
$ xcrun --show-sdk-path --sdk macosx

# Xcode 付属のものに変更
$ sudo xcode-select -switch /Applications/Xcode14.3.1.app/Contents/Developer

# 再度確認する
$ xcrun --show-sdk-path --sdk macosx
/Applications/Xcode14.3.1.app/Contents/Developer/Platforms/MacOSX.platform/Developer/SDKs/MacOSX13.3.sdk
SwiftLint の Build Phases の変更
これまで Build Phases に以下のように書いていました。
if which mint >/dev/null; then
  xcrun --sdk macosx mint run swiftlint swiftlint autocorrect --format
  xcrun --sdk macosx mint run swiftlint swiftlint
else
  echo "warning: Mint not installed, download from https://github.com/yonaskolb/Mint"
fi
これを以下のように変更。M1 環境で Homebrew 導入コマンドを Xcode から叩けない場合の対処法を参考にしました。
export PATH=$PATH:/opt/homebrew/bin:/opt/homebrew/sbin
if [ -f "$SRCROOT/.envrc" ]; then
  source "$SRCROOT/.envrc"
fi

if mint list | grep -q 'SwiftLint'; then
  xcrun --sdk macosx mint run swiftlint autocorrect --format
  xcrun --sdk macosx mint run swiftlint
else
  echo "warning: SwiftLint not installed, download from https://github.com/realm/SwiftLint"
fi
次のエラーを解消するために、Based on dependency analysisのチェックを外します。
Run script build phase ‘SwiftLint’ will be run during every build because it does not specify any outputs. To address this warning, either add output dependencies to the script phase, or configure it to run in every build by unchecking “Based on dependency analysis” in the script phase.
Ruby 環境の構築
Macにrbenv+bundlerをインストールしてruby環境を構築するとMac に Ruby をインストールを参考に、rbenv を入れてRubyのバージョンを切り替えて利用できるようにしておきます。
Homebrew を利用してインストールしていきます。ターミナルを開き以下を実行していきます。
$ brew install rbenv ruby-build

$ brew list
==> Formulae
autoconf	m4		pkg-config	readline
libyaml		mint		rbenv		ruby-build

# rbenv の初期化とシェルとの統合
$ rbenv init
# Load rbenv automatically by appending
# the following to ~/.zshrc:

eval "$(rbenv init - zsh)"

$ echo 'eval "$(rbenv init - zsh)"' >> ~/.zshrc

# 変更を反映しておく
$ source ~/.zshrc

# 正しく設定されているかの確認
$ curl -fsSL https://github.com/rbenv/rbenv-installer/raw/main/bin/rbenv-doctor | bash

Checking for `rbenv' in PATH: /opt/homebrew/bin/rbenv
Checking for rbenv shims in PATH: OK
Checking `rbenv install' support: /opt/homebrew/bin/rbenv-install (ruby-build 20230717)
Counting installed Ruby versions: none
  There aren't any Ruby versions installed under `/Users/ユーザ/.rbenv/versions'.
  You can install Ruby versions like so: rbenv install 3.2.2
Auditing installed plugins: OK

$ rbenv -v
rbenv 1.2.0

# インストールできるRubyを確認
$ rbenv install -l
3.0.6
3.1.4
3.2.2
jruby-9.4.3.0
mruby-3.2.0
picoruby-3.0.0
truffleruby-23.0.0
truffleruby+graalvm-23.0.0

Only latest stable releases for each Ruby implementation are shown.
Use 'rbenv install --list-all / -L' to show all local versions.

# Ruby をインストール
$ rbenv install 3.2.2

# インストールされているRubyを確認
$ rbenv versions
* system
  3.2.2

# システム全体のRubyのバージョンを変更
$ rbenv global 3.2.2

$ rbenv versions
  system
* 3.2.2 (set by /Users/ユーザ名/.rbenv/version)
続いて Bundler をインストールします。
$ sudo gem install bundler

$ bundler -v
Bundler version 1.17.2
CocoaPods のインストール
Ruby を使ってCocoaPods をインストールします。
$ sudo gem install cocoapods
bundler で cocoapods そのもののバージョン管理をするを参考に Bundler を用いてCocoaPods を導入します。
# 対象のプロジェクトディレクトリに移動
$ cd ~/XcodeProjects/ProjectName/
$ bundler init
Gemfileが生成されたので、その中に cocoapods を追加します。
# frozen_string_literal: true

source "https://rubygems.org"

git_source(:github) {|repo_name| "https://github.com/#{repo_name}" }

gem 'cocoapods' , '1.12.1'
# Gemfile をもとにインストール
$ bundle install --path vendor/bundle

# CocoaPods のバージョンを確認
$ bundle exec pod --version
1.12.1

# pod install の実行
$ bundle exec pod install
最後に.gitignoreにvendor/bundleを追加します。
# 略

vendor/bundle
M1 Mac & Xcodeで「building for iOS Simulator, but linking in object file … for architecture arm64」エラーの対処法ではExcluded ArchitecturesにAny iOS Simurator SDKを追加し、そこにarm64を追加すれば良いと書いてありますが、自作の SwiftPackage 以下のようなエラーが出ました。
Build failed because Hoge.swiftmodule is missing required architecture. Would you like to build for Rosetta instead?
Resetta を使わない方法として、[For simulator] How to build Swift packages as x86_64 in Xcode and M1 mac (Apple silicon) without using rosettaを参考にExcluded ArchitecturesにAny iOS Simurator SDKは追加せず、エラーが出てしまうライブラリのアップデートでどうにかできないか対応してみます。
pod updateでライブラリをアップデートして再度ビルド。ダメでした。
色々と調査した結果、ライブラリ側に arm64対応をしてほしいと伝えて対応をしてもらう必要があるようです。
とりあえずは、M1 Mac & Xcodeで「building for iOS Simulator, but linking in object file … for architecture arm64」エラーの対処法の対処 + Resetta のインストールで対応しました。
Resettaのインストール
Rosetta を使えば、Apple シリコンを搭載した Mac でも、Intel プロセッサ搭載 Mac 用に開発された App を使えるようになります。
Mac に Rosetta をインストールする必要がある場合
# Resetta をインストール
$ softwareupdate --install-rosetta
I have read and agree to the terms of the software license agreement. A list of Apple SLAs may be found here: https://www.apple.com/legal/sla/
Type A and press return to agree: A
Xcode で iOS シミュレータを動かす
XCode doesn’t launch on Simulatorの回答を参考に以下の手順でシミュレータでビルドをします。
1. Xcode でプロジェクトを開く
2. メニューバーより Product > Destination > Destination Architectures > Show Both を選択
3. Run Destination を iPhone 14 Pro (Rosetta) を選択
4. command + shift + Kでクリーンビルドをする。
5. 実行する。
上記手順通りでなくても、自分は3のみでも実行ができました。
テンプレートを配置する
MVVM モデル用に作成していたテンプレートを配置します。
以前のMacよりテンプレートファイルをコピーし、/Applications/Xcode14.3.1.app/Contents/Developer/Library/Xcode/Templates/File Templates/MultiPlatform/User Interface以下に配置しました。
Android Studio
Android Studioをインストール。
Mac with Apple chip を選択。今回は最新の Android Studio Giraffe をいれてみます。
インストールが完了したら、さらに設定を行います。
Android SDK のインストール
Android Studio を開き、メニューバー > Settings > Language & Frameworks > Android SDK を表示します。
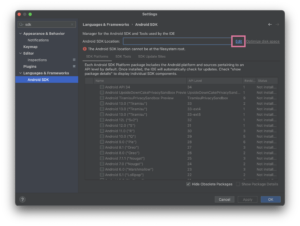
Edit ボタン押下後、手順に従ってインストールします。

再度 メニューバー > Settings > Language & Frameworks > Android SDK を開き、Android 13.0 (Tiramisu)にチェックを入れ、Applyを押します。
build.gradleを開き、Syncを行います。
エミュレータのインストール
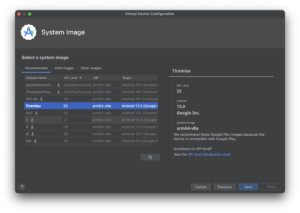
メニューバー > Tools > DeviceManager を開き、Create Deviceを選択します。
Pixel 7 を選択し、Tiramisu をダウンロードして選択します。
完了後、デバイスを選択して Run をします。無事にエミュレータで実行できました。
エミュレータを動かすには Rosetta が必要であるはずなので、先にRosetta のインストールをおこなっておいてください。
その他のアプリケーションのインストール
Slack
Slackのダウンロードページよりダウンロード。
VSCode
Visual Studio Codeをダウンロード。
.zshrcにすでにcodeコマンドでファイルが開けるようになっているので確認。
# VSCode
function code {
    if [[ $# = 0 ]]
    then
        open -a "Visual Studio Code"
    else
        local argPath="$1"
        [[ $1 = /* ]] && argPath="$1" || argPath="$PWD/${1#./}"
        open -a "Visual Studio Code" "$argPath"
    fi
}
# ターミナルで code コマンドを利用できることを確認
$ code .zshrc
Sketch
Sketchをダウンロード。
サインインする。
登録されているアカウントの確認は、古いMacで Slack を開き、メニューバー > Settings > Account タブ より確認。
使っていたSketchがかなり古かったのでライセンスキー形式の方ではなく Workspace を用いたサブスクの方に移行。大変。
Docker
Docker Desktopより、Apple Chip でインストール。
起動をしてサインインしておく。
SF Symbols 4のインストール
SF Symbols 4のカタログをインストールしました。
その他の設定
マウスポインタの速度設定
システム設定 > トラックパッド > 軌跡の速さ
ライブ変換をオフにする
上部メニューバーより[ A ] をタップ > 日本語 [ あ ] に変更 > ライブ変換のチェックを外す
https://support.apple.com/ja-jp/guide/japanese-input-method/jpim10265/mac
スポットライト検索をオフにする
システム設定 > キーボード > キーボードショートカット > Spotlight > Spotlight検索を表示 のチェックを外す
Dockを非表示にする
システム設定 > デスクトップとDock > Dock を自動的に表示/非表示 をオン
最近使ったアプリケーションをDockに表示もオフにした。
Apple Music の認証
このコンピュータ上でApple MusicやiTunes Matchを使用するには、コンピュータを承認する必要があります。
iTunes Store で購入したコンテンツを使うためにコンピュータを認証/認証解除する
メニューバー > アカウント > 認証 > このコンピュータを認証
草を打ちやすくする
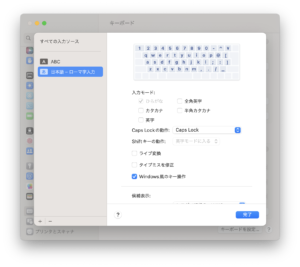
「wwww」と打ちたいのに「っっっw」となるのが地味に困るので設定。
システム設定 > キーボード > 入力ソース [編集] > 日本語 – ローマ字入力 > Windows 風のキー操作を オン
ユニバーサルクリップボードの設定
iPhone と Mac でクリップボードを共有する設定。
同じAppleIDでログイン。同じ Wi-Fi に接続。Bluetooth をオンにする。
Mac で システム設定 > 一般 > AirDrop と Handoff > この Mac と iCloud デバイス間での Handoff を許可 をオンにする。
iPhone 側でも同様に 設定アプリ > 一般 > AirPlay と Handoff > Handoff をオンにする。
VPSとのSSH接続用の鍵を再生成
ローカルで鍵を作って、サーバ側に配置します。ターミナルで鍵を生成します。
$ cd ~/.ssh

$ ssh-keygen -t ed25519 -C "your_email@example.com"
> vps_id_ed25519
> キーフレーズの入力

$ chmod 600 ~/.ssh/vps_id_ed25519.pub
以前接続していた古いMacの方から公開鍵をわたしてあげることにします。vps_id_ed25519.pub を古いMac上にコピーし、scpコマンドでサーバに配置します。
$ scp -P ポート番号 ~/.ssh/vps_id_ed25519.pub ユーザ名@IPアドレス:~/.ssh/vps_id_ed25519.pub

# サーバにログインする
$ ssh -p ポート番号 ユーザ名@IPアドレス

% cd ~/.ssh
# authorized_keys には複数の公開鍵を保存できる(authorized_keysという名前はリネーム禁止)
% cat vps_id_ed25519.pub >> authorized_keys
# 持ってきたファイル自体は削除しておく
% rm vps_id_ed25519.pub
新しいMacの ~/.ssh/configに追記します。
## VPS
Host IPアドレス
 HostName IPアドレス
 IdentityFile ~/.ssh/vps_id_ed25519.pub
 User ユーザ名
さらにその他
– Dockの整理
– デスクトップの設定
その他にやること
今のところ思いついてない